This Navy flier can be a good example for all of us. He knew that there was always the possibility that he would be shot down and that he would need to survive. Rather than bury his head in the sand and ignore the issue, he reviewed the survival kit he was issued as a Navy aviator and supplemented it to meet his personal needs. When other pilots saw him doing this, they took a second look at their own kits and began doing the same thing.
This brings up another good lesson. Without sacrificing OPSEC we can be an example of preparedness to those around us. If someone is new to prepping and seems interested, try to foster that interest and get them on their way to self sufficiency.
What have YOU done to prepare you and your family today?
If my allergies are any indication, Spring has sprung. This means it is time for Daylight Saving Time, spring cleaning, starting gardens and other activities.
We had an emergency at work today, involving a critical server that was not properly cared for by its department. Due to the severity of the situation, I was called in to help recover the server. I had to go pick up the server from the data center and bring it back to to office to work on it. It was important enough that my boss offered to let me take his car, a 2006 Cadillac CTS. I think he was a little surprised when I declined, in favor of driving my 1998 Corolla instead. Continue reading “Prepping for Work Disasters”
With the recent storms, and onset of Winter conditions here in Utah, I felt it appropriate to send out a little reminder of things people should do to prepare for winter driving. Please prepare before the storms come, so that you can be ready for the enjoyable experience that is Utah roads in the Winter. Continue reading “Reminder: Driving in Snow”
Corn – You can boil it, toast it, roast it, parch it, eat it raw, grill it, steam it, stew it, cream it, grind it, feed humans or animals with it. You can eat it fresh, freeze it, can it, dry it, drink it or burn it in your vehicle. It’s a diverse food that can serve a prepper well if they know what to do with it.
Parched corn was eaten regularly by American Indians warriors and hunters as an extremely lightweight, high energy trail food long before European explorers showed up and was a typical food or treat for the pioneers as well. It is the original “trail snack” and can also be ground up for stews or soups.
When starting a flint and steel or striker type of fire, char cloth makes all the difference in being able to actually get the fire started or just making a bunch of sparks that never catch anything on fire. Char cloth (sometimes also called charred cloth) is one of those amazing mountain man items that is still very useful today. Char cloth is pieces of blackened fabric that easily catch a spark and burn similarly to the way steel wool burns–no big flame, but a nice ember burn that doesn’t blow out once it’s lit. The spark lights the char cloth and the char cloth is used to light the other tinder. I’ve been wanting to add char cloth to my fire kits and having used all my char cloth made by others, I decided to make a batch of my own.
100% cotton jersey fabric
I had some basic directions to go off of, but had never made it myself, so here’s how the first round went. I got some 100% cotton fabric–I used jersey fabric (an old T shirt) and cut it into approximately 2″ squares. Mine was kind of a natural color, but you could probably use any color you have, just avoid screen-printed designs, etc. I cut the ribbing off from the neck and sleeve ends as well as the seams. You just want the fabric.
Next, I got a metal can–I used an old cookie tin. I punched a vent hole in the can lid with a hammer and nail. You can use whatever metal can you have–I’ve seen it done with smaller tins as well as cleaned out food cans with foil for a lid.
Char cloth cooking tinCut cloth in the tin
I put the cut up fabric squares in the tin, put the lid on, and put the can on my grill on low and let it cook. You definitely want to do this outside–burning fabric doesn’t smell all that good. My instructions said to cook it until it stopped smoking. I had the tin fairly full, and cooked it close to 3 hours before I decided to turn it off. It never smoked a lot. When it cooled, I opened the can and only the bottom 3-4 layers were black, the rest of the fabric was brown.
I turned the pile over and put it back on the grill on Medium this time and cooked it another close to 3 hours. This time it was all black when it was finished. However, it didn’t catch a spark very well. I could light it with a flame, or an occasional large spark, but it was very frustrating to work with. Nothing like the char cloth I’d had before that a friend of ours made from terry cloth (old towel).
Cooked jersey char cloth
So I put it back on the grill again, this time I only filled the can about 1/3 full and cooked it on high another 3 hours or so. Now it was a little more fragile and easy to tear (as char cloth generally is), but it still didn’t catch spark well. I had no more ideas to make it better, so I decided to start over.
Cotton monks' cloth (quarter for scale) and smaller cooking tin
The second and far better batch of char cloth I made started with 100% cotton monk’s cloth I got at Walmart. Notice the loose weave and air holes. Those made a huge difference. I cut it a little smaller this time–about 1 1/2 inch square as 2″ was a little larger than necessary. There is some shrinkage as it cooks, but not that much. I wanted to see if it would work straight from the store without washing the fabric first, so I only cut 5 squares of it.
I put it in a smaller tin which also got the hammer/nail air vent in the lid.
Feeling like I’d spent enough of my grill gas on this project, I opted to do this round real mountain man style and build a fire and toss the tin in the fire. I pretty well buried it–it’s in there somewhere.
Real mountain man char cloth cooking method
It did not cook long in the fire–maybe 15 minutes (of course it was in a smaller tin than the first round, but I’m guessing even a large tin wouldn’t take 9 hours in the fire). I couldn’t tell when it stopped smoking since it was in a fire with all the rest of the smoke, so I just guessed at when to pull it out. It wouldn’t matter if it stayed in there until the fire burned out as long as no sparks got in the airhole and caught all the fabric on fire in the meantime.
Cooked monk's cloth char cloth
I fished it out, let it cool, and opened it to nicely blackened monk’s cloth.
This second round of char cloth lights up with minimal spark from a firestarter or flint/steel. It is more fragile than the jersey char cloth, but works much better. I’ll have to post on flint/steel firestarting another time :)
Char cloth burning
So, to recap, to make better char cloth, start with a 100% cotton fabric with texture and a fairly loose weave. Use a fire pit if you can to save on gas. Cooking on higher heat and cooking a smaller batch help speed up cooking time. Happy firestarting!
Contrary to the belief of some, being a Prepper is NOT synonymous with being well armed and ready to protect yourself and your preps in a violent situation. However, this article is specifically about being prepared to defend yourself, your family and your preps if it comes down to it.
History shows us that when things go bad we can expect riots, looters, roving gangs of marauders and plenty of random acts of armed violence. We have witnessed this just this week with the riots in Iran that ended in violence. Or we can look at the looting during Hurricane Katrina, rioting and looting during the L.A. Rodney King riots, the French riots (pictured above) and several others.
This is the sixth installment of the Evacuation Preparedness Kit Series. The first post, on Evac Prep Basics is here, and the second post, which introduces the Evac Prep Master List is here. The third post, and the first post on the list review is here. This post will cover 72 Hour Kit management.
It seems that every time I inventory my preps I find things that are missing. It’s usually something like that one time when my wife needed to send a couple water bottles to school and the easiest thing to grab was a couple out of a 72 Hour Kit, then we forgot to replace it. Or you needed some batteries, or a flashlight, or whatever. When something can’t be found, it’s hard to not say “Oh, there’s one in the preps somewhere”. Every time it happens there is always good intent to replace the removed item right away – and invariably it is forgotten about.
This is the fifth installment of the Evacuation Preparedness Kit Series. The first post, on Evac Prep Basics is here, and the second post, which introduces the Evac Prep Master List is here. The third post, and the first post on the list review is here. This post will pick up where we previously left off in reviewing the categories on the Master List.
This is the third installment of the Evacuation Preparedness Kit Series. The first post, on Evac Prep Basics is here, and the second post, which introduces the Evac Prep Master List is here.
In this post we’ll be discussing the items in the different categories on the Master List. If you haven’t seen the list yet, you can access it here.
As we go through these categories, keep in mind that your 72 hour kit will be more like packing for an extended hiking trip whereas your Evacuation Kit will be more like packing for an extended camping trip. Also keep in mind that redundancy and the ability to shed your larger kits and still be able to survive with your smaller kits is critically important. You may find yourself in a scenario where you have bugged out with your Evacuation Kit, but for whatever reason you have to ditch most of it and go on foot. Your G.O.O.D bag had better be able to support you while your on foot. Potentially, you could have to drop supplies all the way down to your EDC and be able to survive off the items in your pockets. Redundancy across your kits is paramount. Continue reading “Evacuation Preparedness List Review part 1”


 Our physical needs prioritized – The Rule of 3’s:
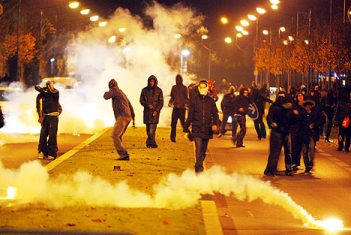

 This is the fifth installment of the Evacuation Preparedness Kit Series. The first post, on
  This is the fourth installment of the Evacuation Preparedness Kit Series. The first post, on
  This is the third installment of the Evacuation Preparedness Kit Series. The first post, on